Ruffled Crochet Border
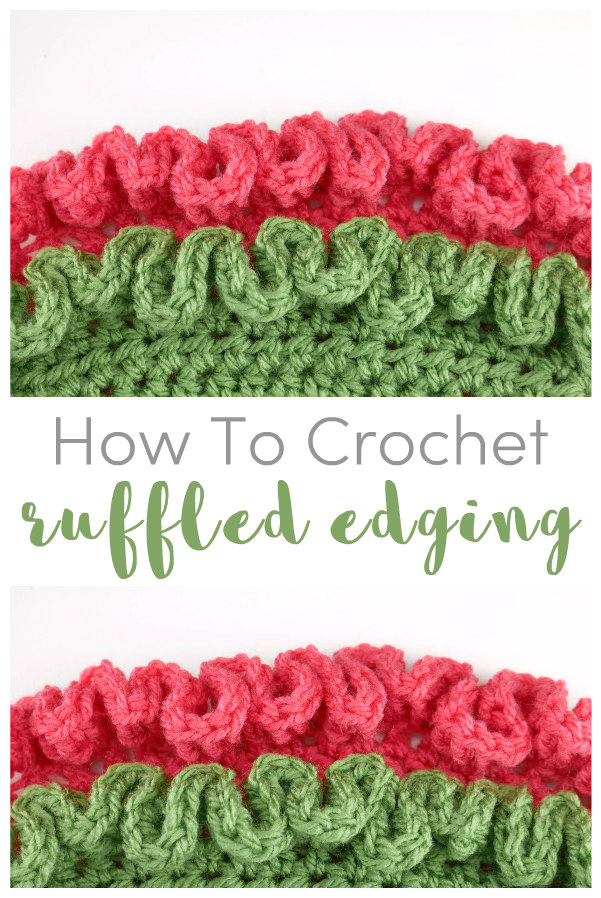
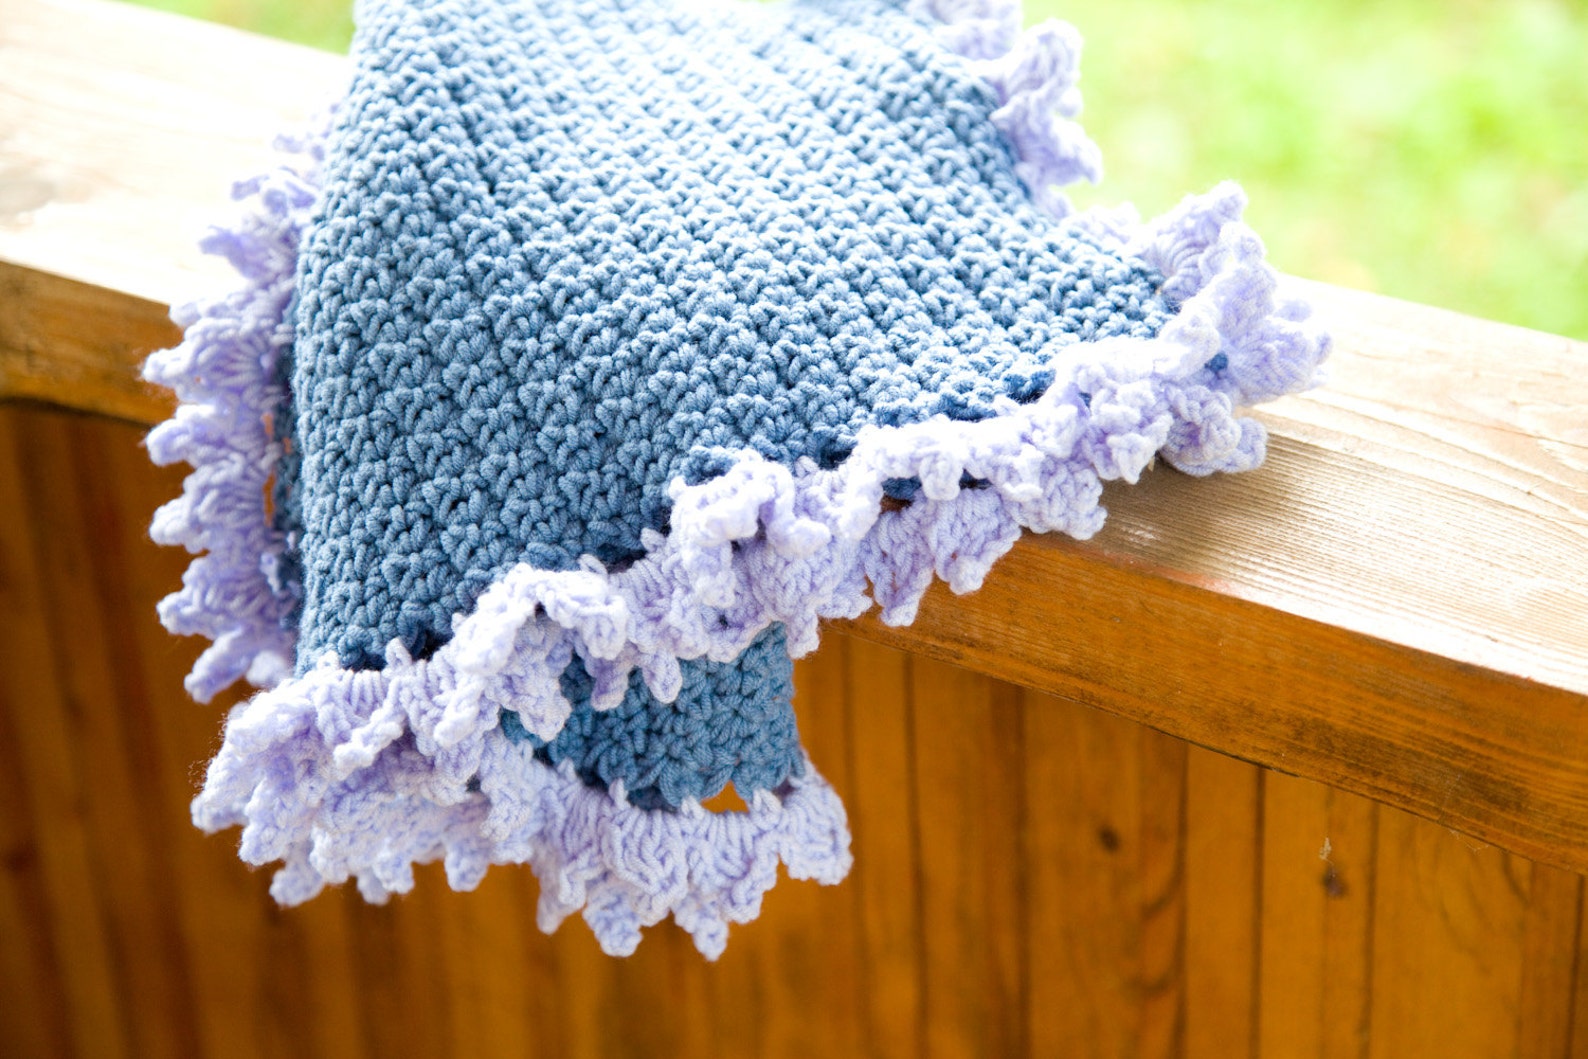
Ruffled Crochet Border - For a border, you need to create a “base round” by making a sc round around your whole project. It doesn’t require a special pattern for corners and that makes it a beginner. Web ruffle edging is a great way to add a fancy touch to the end of your crochet project. I adjusted the pattern so that it worked for multiples of 3, but you can vary. However you add your ruffles, you need to prep your project. On rs join with sl st to any corner. Easy trim ideas for all types of afghans, baby blankets and more! Use this ruffle crochet border on almost anything: Elevate your crochet projects with this delightful and playful technique. Web the best crochet borders and edgings to finish your blankets. This how to crochet ruffle edging video tutorial perfectly shows you an. To start chain 3 times. Web this is one of the easiest and quickest crochet borders that you can do. Check my tutorial for tips on working into the sides of rows. Get out the blanket, skirt, or item that you want to add the ruffle to and look at the edging. Www.fiberfluxblog.com this ruffly crochet border will brighten up any project! Web crochet a perfect easy blanket border ruffle / entrelac edgingso many of you have been on an entrelac kick lately that i thought i would show you how to ma. This will act as your first double crochet. Web learn how to crochet ruffles in this easy free video and photo tutorial. Perfect for edgings on blankets, garments, and more! To start chain 3 times. Work 4 dc in next sc, 2 dc in next, repeat all the way around, slip stitch into first dc, fasten off. If you have mastered the double crochet lesson, this will work up fast. Join with a sl st to first sc. Blankets, pillow covers, placements, shawls and more. Web the best crochet borders and edgings to finish your blankets. Web crochet a perfect easy blanket border ruffle / entrelac edgingso many of you have been on an entrelac kick lately that i thought i would show you how to ma. Web learn how to crochet ruffles in this easy free video and photo tutorial. Web click picture for. This how to crochet ruffle edging video tutorial perfectly shows you and breaks down how you can create this edging. However you add your ruffles, you need to prep your project. Ruffle edge border on blanket or rectangle wrap; Whether you want to add a fancy or frilly touch to the end of your crochet project, this ruffle edging pattern. This is easy enough for a beginner to do since all you need to do to create the ruffles is to increase your stitches a bit. However you add your ruffles, you need to prep your project. Worked in simple stitches, you can add them to the bottom of a s. To start chain 3 times. This how to crochet. Elevate your crochet projects with this delightful and playful technique. Web ruffle edging is a great way to add a fancy touch to the end of your crochet project. Web crochet ruffles are both cute and versatile: This how to crochet ruffle edging video tutorial perfectly shows you an. Web ruffles are a fun and easy way to add some. Start with a slip knot on your hook. Start by putting your hook through the corner hole where you initially started or ended the blanket. Check my tutorial for tips on working into the sides of rows. Slip stitch and drop stitch border. Perfect for beginners and seasoned crocheters alike. Web make a single crochet border around the edge of your piece. Www.fiberfluxblog.com this ruffly crochet border will brighten up any project! Place 3 sc in each corner. Web ruffle edging is a great way to add a fancy touch to the end of your crochet project. Perfect for beginners and seasoned crocheters alike. Use this ruffle crochet border on almost anything: Web crochet ruffles are both cute and versatile: Ruffle edge border on blanket or rectangle wrap; Get the pattern 18 windows border crochet edging photo credit: Web ruffles are a fun and easy way to add some beautiful texture edging to any crochet project. Check my tutorial for tips on working into the sides of rows. Web the best crochet borders and edgings to finish your blankets. If you have mastered the double crochet lesson, this will work up fast. It doesn’t require a special pattern for corners and that makes it a beginner. Perfect for beginners and seasoned crocheters alike. If you have mastered the double crochet lesson, this will work up fast. Web i typically like to use the same color for my single crochet around the edge as i do my ruffle, to make it a bit fuller looking, but you can go with the color of your base or you can make it a third color for. Get the pattern 18 windows border crochet edging photo credit: If your item already has a single crochet border, skip this step. Slip stitch and drop stitch border. Web this week i'm sharing 5 ruffly crochet borders and how to crochet them! Web crochet a perfect easy blanket border ruffle / entrelac edgingso many of you have been on an entrelac kick lately that i thought i would show you how to ma. Join with a sl st to first sc. Web ruffled crochet edging. Work 4 dc in next sc, 2 dc in next, repeat all the way around, slip stitch into first dc, fasten off. If it doesn't have a single crochet border, work a quick one so you have something to attach the ruffles to. Even simpler than the single crochet border, the slip stitch/drop stitch border is perfect when you do not want to add much width or height to your crochet piece but still want a finished look. It finishes off any project wonderfully!link to see on finished blanket: Perfect for edgings on blankets, garments, and more! Web the ruffled edge border is constructed with multiple double crochet stitches crocheted in each stitch around the edge, resulting in a curly and textured border. It doesn’t require a special pattern for corners and that makes it a beginner. Get out the blanket, skirt, or item that you want to add the ruffle to and look at the edging. This is easy enough for a beginner to do since all you need to do to create the ruffles is to increase your stitches a bit.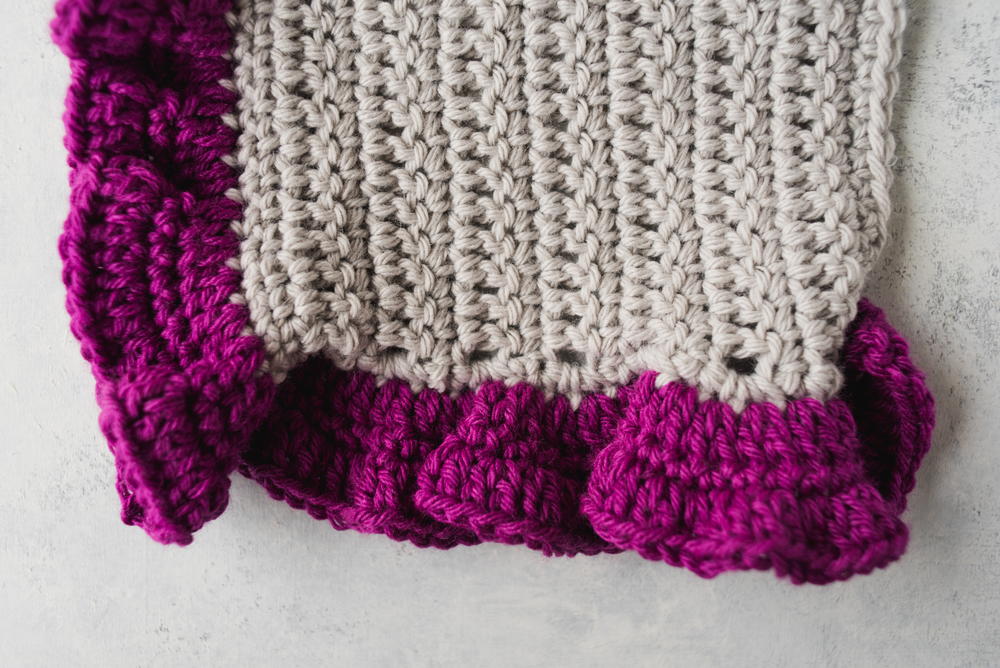
How to Crochet Ruffle Edging

Easy Crochet Ruffle Edge Ruffle crochet edging, Crochet border

5 Ruffle Crochet Borders & How to Crochet Them Crochet Tutorial YouTube
How to Crochet Ruffle Edging

Easy Crochet Ruffle Edge ⋆ Dream a Little Bigger Ruffle Crochet Edging

Easy Crochet Ruffle Edge Crochet blanket edging, Crochet ruffle
Crochet Ruffle Border Blanket Pattern baby afghan with Etsy

Handwork by Hannah Baby Blanket with Ruffle Border

How to Crochet Ruffled Edging YouTube

37+ Simple Crochet Borders Patterns
Start By Putting Your Hook Through The Corner Hole Where You Initially Started Or Ended The Blanket.
This Very Easy Border Or Edging Is A Very Attractive Way To Finish Your Blankets Or Afghans, Or To Add Embellishments To Retail Or Crochet Or Knitted Garments Or Home Accessories Such As Pillows Or Blankets.
Web I Typically Like To Use The Same Color For My Single Crochet Around The Edge As I Do My Ruffle, To Make It A Bit Fuller Looking, But You Can Go With The Color Of Your Base Or You Can Make It A Third Color For An Interesting Visual Pop Between The Two.
If You Have Mastered The Double Crochet Lesson, This Will Work Up Fast.
Related Post: